This is the 2nd part of a 4 part series covering the rom-rb and dry-rb suites of gems.
- Part 1: Application + Database setup
In this part, we’re going to look at how to add data validation to our application. Our application currently has a way of creating users, but there’s nothing preventing those users being created without their first_name or last_name set. In this part, we’ll add some code to validate that both of these fields are set. We’re going to add this code by using a gem called dry-validation.
When we’ve added this code, it’s going to sit apart from the repositories and relations that we’ve built already, and we will need a way of connecting these pieces. The way that we will connect these pieces is through the dry-monads gem.
When we’re done here, we’ll have a class that encapsulates all the actions of creating a user:
- Validates
first_nameandlast_nameare present - If they aren’t present, returns an error.
- If they are present, the user data is persisted to the database
We’ll call this class a operation, as it will contain all the logic for performing a particular operation with our system; the operation of creating a new user.
This part of the guide previously called this type of class a transaction, but in order to not conflate these with database transactions, a different name has been used. Other people might call these service objects or interactors.
If you’d like to see the code for this application, it’s at github.com/radar/bix, and each part of this series has its own branch.
Let’s begin!
Adding validations
Validations are a key part of any application. We need to make sure that before data is stored in our database that it is valid. In our currently very small application, we so far have just one type of data: users. Still, in this tiny application it doesn’t really make much sense to create users that don’t have a name. In this section we’re going to add a class that will validate a particular input for user data is valid.
To start with, we’ll need to add the dry-validation gem to our Gemfile:
gem 'dry-validation', '~> 1.4'
Next up, we’ll need to install the gem:
bundle install
We’ll need to require this gem somewhere too, so that it is loaded in our application. To load this gem and other gems that we’ll add in the future, we’ll create a new file at system/boot/core.rb.
Bix::Application.boot(:core) do
  init do
    require "dry-validation"
  end
end
This new file will include any sort of setup logic that we will need for the core part of our application. This is going to be everything that we’ll need when running the plain Ruby code for our application. We have a db.rb and persistence.rb file in this same directory that contains logic for anything we want to do with a database. n the last part of this guide, we’ll add a fourth file in this directory called web.rb and that file will contain setup logic for anything to do with handling web requests.
The dry-validation gem allows us to create classes to encapsulate validation logic, and this gem uses another dry-rb gem under the hood called dry-schema
These classes are called contracts. We’ll create our first contract at lib/bix/contracts/users/create_user.rb:
module Bix
  module Contracts
    module Users
      class CreateUser < Dry::Validation::Contract
        params do
          required(:first_name).filled(:string)
          required(:last_name).filled(:string)
          optional(:age).filled(:integer)
        end
      end
    end
  end
end
This class defines a contract that says that when we’re creating users, there has to be at least two parameters – first_name and last_name, and they both have to be filled (present) strings. This contract also says that an age parameter is optional, but when it’s specified it’s an integer. Let’s try using this contract now in bin/console:
create_user = Bix::Contracts::Users::CreateUser.new
result = create_user.call({})
To use this contract, we need to initialize a new object from the class and then use the call method on that new object. The argument that we pass it are the parameters for the contract, which in this case is just an empty Hash.
When we call this contract, we see the validation errors returned:
=> #<Dry::Validation::Result{} errors={:first_name=>["is missing"], :last_name=>["is missing"]}>
The returned object is a Result object, and with that result object we can determine if the validation was successful by calling the success? method:
result.success?
# => false
If we wanted to display these error messages (for example, as feedback to a user) we could call:
result.errors.to_h
=> {:first_name=>["is missing"], :last_name=>["is missing"]}
Let’s look at what happens when we pass valid data, but with a twist: all of our values are strings. This is the kind of data you would get from a form submission through a web application:
create_user = Bix::Contracts::Users::CreateUser.new
result = create_user.call(first_name: "Ryan", last_name: "Bigg", age: "32")
=> #<Dry::Validation::Result{:first_name=>"Ryan", :last_name=>"Bigg", :age=>32} errors={}>
result.success?
# => true
Great, our contract is correctly validating input! What’s interesting to note here is that the age parameter is being correctly typecast from a String to an Integer. This is because we have defined that field to be an integer in our contract:
module Bix
  module Contracts
    module Users
      class CreateUser < Dry::Validation::Contract
        params do
          required(:first_name).filled(:string)
          required(:last_name).filled(:string)
          optional(:age).filled(:integer)
        end
      end
    end
  end
end
If we pass data from a form submission through our contract before we work through it, the data will have all the correct types and we don’t need to coerce that data when we’re working with – dry-validation has done that for us. After this point, our data will always be in the correct type.
Another thing to note with our new contract is that it will only return the specified fields. Extra fields will be ignored:
create_user = Bix::Contracts::Users::CreateUser.new
result = create_user.call(first_name: "Ryan", last_name: "Bigg", age: "32", admin: true)
# => #<Dry::Validation::Result{:first_name=>"Ryan", :last_name=>"Bigg", :age=>32} errors={}>
The admin field doesn’t appear here at all, even though we’ve specified it as an input to this contract.
So in summary, here’s what we’re given by using a dry-validation contract:
- Validations to ensure fields meet certain criteria
- Automatic type coercion of fields into their correct types
- Automatic limiting of input to just the fields we have specified
Intro to Dry Monads
Now that we have a way to create user records (the Bix::Repos::UserRepo) and a way to validate that data before it gets into the database (Bix::Contracts::Users::CreateUser), we can combine them to ensure data is valid before it reaches out database.
To do this combination, we could write a class like this:
class CreateUser
  def call(input)
    create_contract = Bix::Contracts::Users::Create.new
    result = create_contract.call(input)
    if result.success?
      user_repo = Bix::Repos::User.new
      user_repo.create(input)
    else
      result
    end
  end
end
From the start, this class doesn’t look so bad. But if we added one more if condition or perhaps some code to send a “successful sign up” email to a user, this class would get longer and more complex.
To avoid that kind of complexity, the dry-rb suite of gems provides another gem called dry-monads. Among other things, this dry-monads gem provides us with a feature called “Do Notation”. This feature will allow us to write our CreateUser class in a much cleaner way that will also allow for extensibility later on – if we want that.
Let’s add this gem to our Gemfile now:
gem 'dry-monads', '~> 1.3'
And we’ll run bundle install to install it.
Next up, we will need to require this gem in system/boot/core.rb:
Bix::Application.boot(:core) do
  init do
    require "dry-validation"
    require "dry/monads"
    require "dry/monads/do"
  end

  start do
    Dry::Validation.load_extensions(:monads)
  end
end
We’ve changed core.rb here to require dry/monads and dry/monads/do. The second file will give us access to Dry Monad’s Do Notation feature. We’ve added a start block here, which will run when our application is finalized. This will add an extra to_monad method to our validation results. We’ll see this used in a short while.
Before we get there, we need to talk about two things. One is called the Result Monad, and the other is the Do Notation.
Result Monad
The Result Monad is a type of object that can represent whether an action has succeeded or failed. Where it comes in handy is when you have a chain of actions that you might want to stop if one of those things goes wrong. For instance, in the above code when the user is invalid, we want the code to not persist the user to the database.
To do this with dry-monads, we would return one of two types of the result monad, a Success or Failure. Here’s a flowchart showing what would go on when we use a Result monad:

Here we have a “Create User” action that has two steps: a “Validate User” and a “Persist User” step. When our “Create User” action receives some parameters, it passes them to the “Validate User” step. When this step runs, there can be one of two results: success or failure.
When the validation succeeds, that step returns a Success result monad which will contain the validated (and type-casted!) parameters.
If the validation fails, the step returns a Failure result monad. This monad contains the validation errors.
When our code sees a Failure Result Monad returned, it will not execute the remaining steps. In the above diagram, the validation of a user must succeed before persistence happens. Just like in the earlier code we wrote too.
Do Notation
The Result Monad is used in conjunction with that other feature of dry-monads I mentioned earlier: Do Notation. Let’s take the above CreateUser class and re-write it using dry-monads’ Do Notation. We’ll put this class at lib/bix/operations/users/create_user.rb:
module Bix
  module Operations
    module Users
      class CreateUser
        include Dry::Monads[:result]
        include Dry::Monads::Do.for(:call)


        def call(input)
          values = yield validate(input)
          user = yield persist(values)

          Success(user)
        end

        def validate(input)
          create_contract = Contracts::Users::Create.new
          create_contract.call(input).to_monad
        end

        def persist(result)
          user_repo = Bix::Repos::UserRepo.new
          Success(user_repo.create(result.values))
        end
      end
    end
  end
end
This code is a bit longer than the code we had previously. However, it comes with a few benefits. The first of these is that each step is clearly split out into its own method.
The call method here is responsible for ordering the steps of our operation. It takes our initial input for this operation and runs it through the validator. All of that validation logic is neatly gathered together in the validate method:
def validate(input)
  create_contract = Contracts::Users::CreateUser.new
  create_contract.call(input).to_monad
end
In this method, we use our contract that we built earlier. When we call this contract, it will return a Dry::Validation::Result object. To use this in conjunction with dry-monads’ Do Notation, we need to convert this object to a Result Monad. We do this by calling to_monad on the result.
If the validation succeeds, we’ll get back a Success(validated_input) result monad, otherwise a Failure(validation_result) result monad will be returned.
If it fails at this point, the operation will stop and return the validation failure.
If it succeeds however, the operation to the next step: create_user:
def create_user(result)
  user_repo = Bix::Repos::UserRepo.new
  Success(user_repo.create(result.values))
end
This step takes a result argument, which will be the validated_input returned from our validation step. We then initialise a new repo, and use that to create a user, taking the result.values. These values will be the validated and type-casted values from the validation’s result.
Let’s try using this class now in bin/console:
create_user = Bix::Operations::Users::CreateUser.new
result = create_user.call(first_name: "Ryan", last_name: "Bigg", age: 32)
# => Success(#<Bix::User id=4 first_name="Ryan" last_name="Bigg" age=32 ...>)
When we use this operation, it runs the validation and persistence steps for us. If everything goes well, like in the above example, then we get back a Success result monad.
Let’s see what happens if the validation fails in this operation:
create_user = Bix::Operations::Users::CreateUser.new
result = create_user.call(first_name: "Ryan", last_name: "", age: 32)
# => Failure(#<Dry::Validation::Result{:first_name=>"Ryan", :last_name=>"", :age=>32} errors={:last_name=>["must be filled"]}>)
This time, we get back a Failure result monad, which is wrapping our Dry::Validation::Result. This will mean that the persistence won’t happen at all.
Our operation class so far has only two methods, but could be expanded out to include more. Perhaps we would want to send an email to the user to confirm that they’ve signed up?
Or what if we had a operation class that handled account signup, where both an account and a user had to be created? A flowchart for that operation class would look like this:
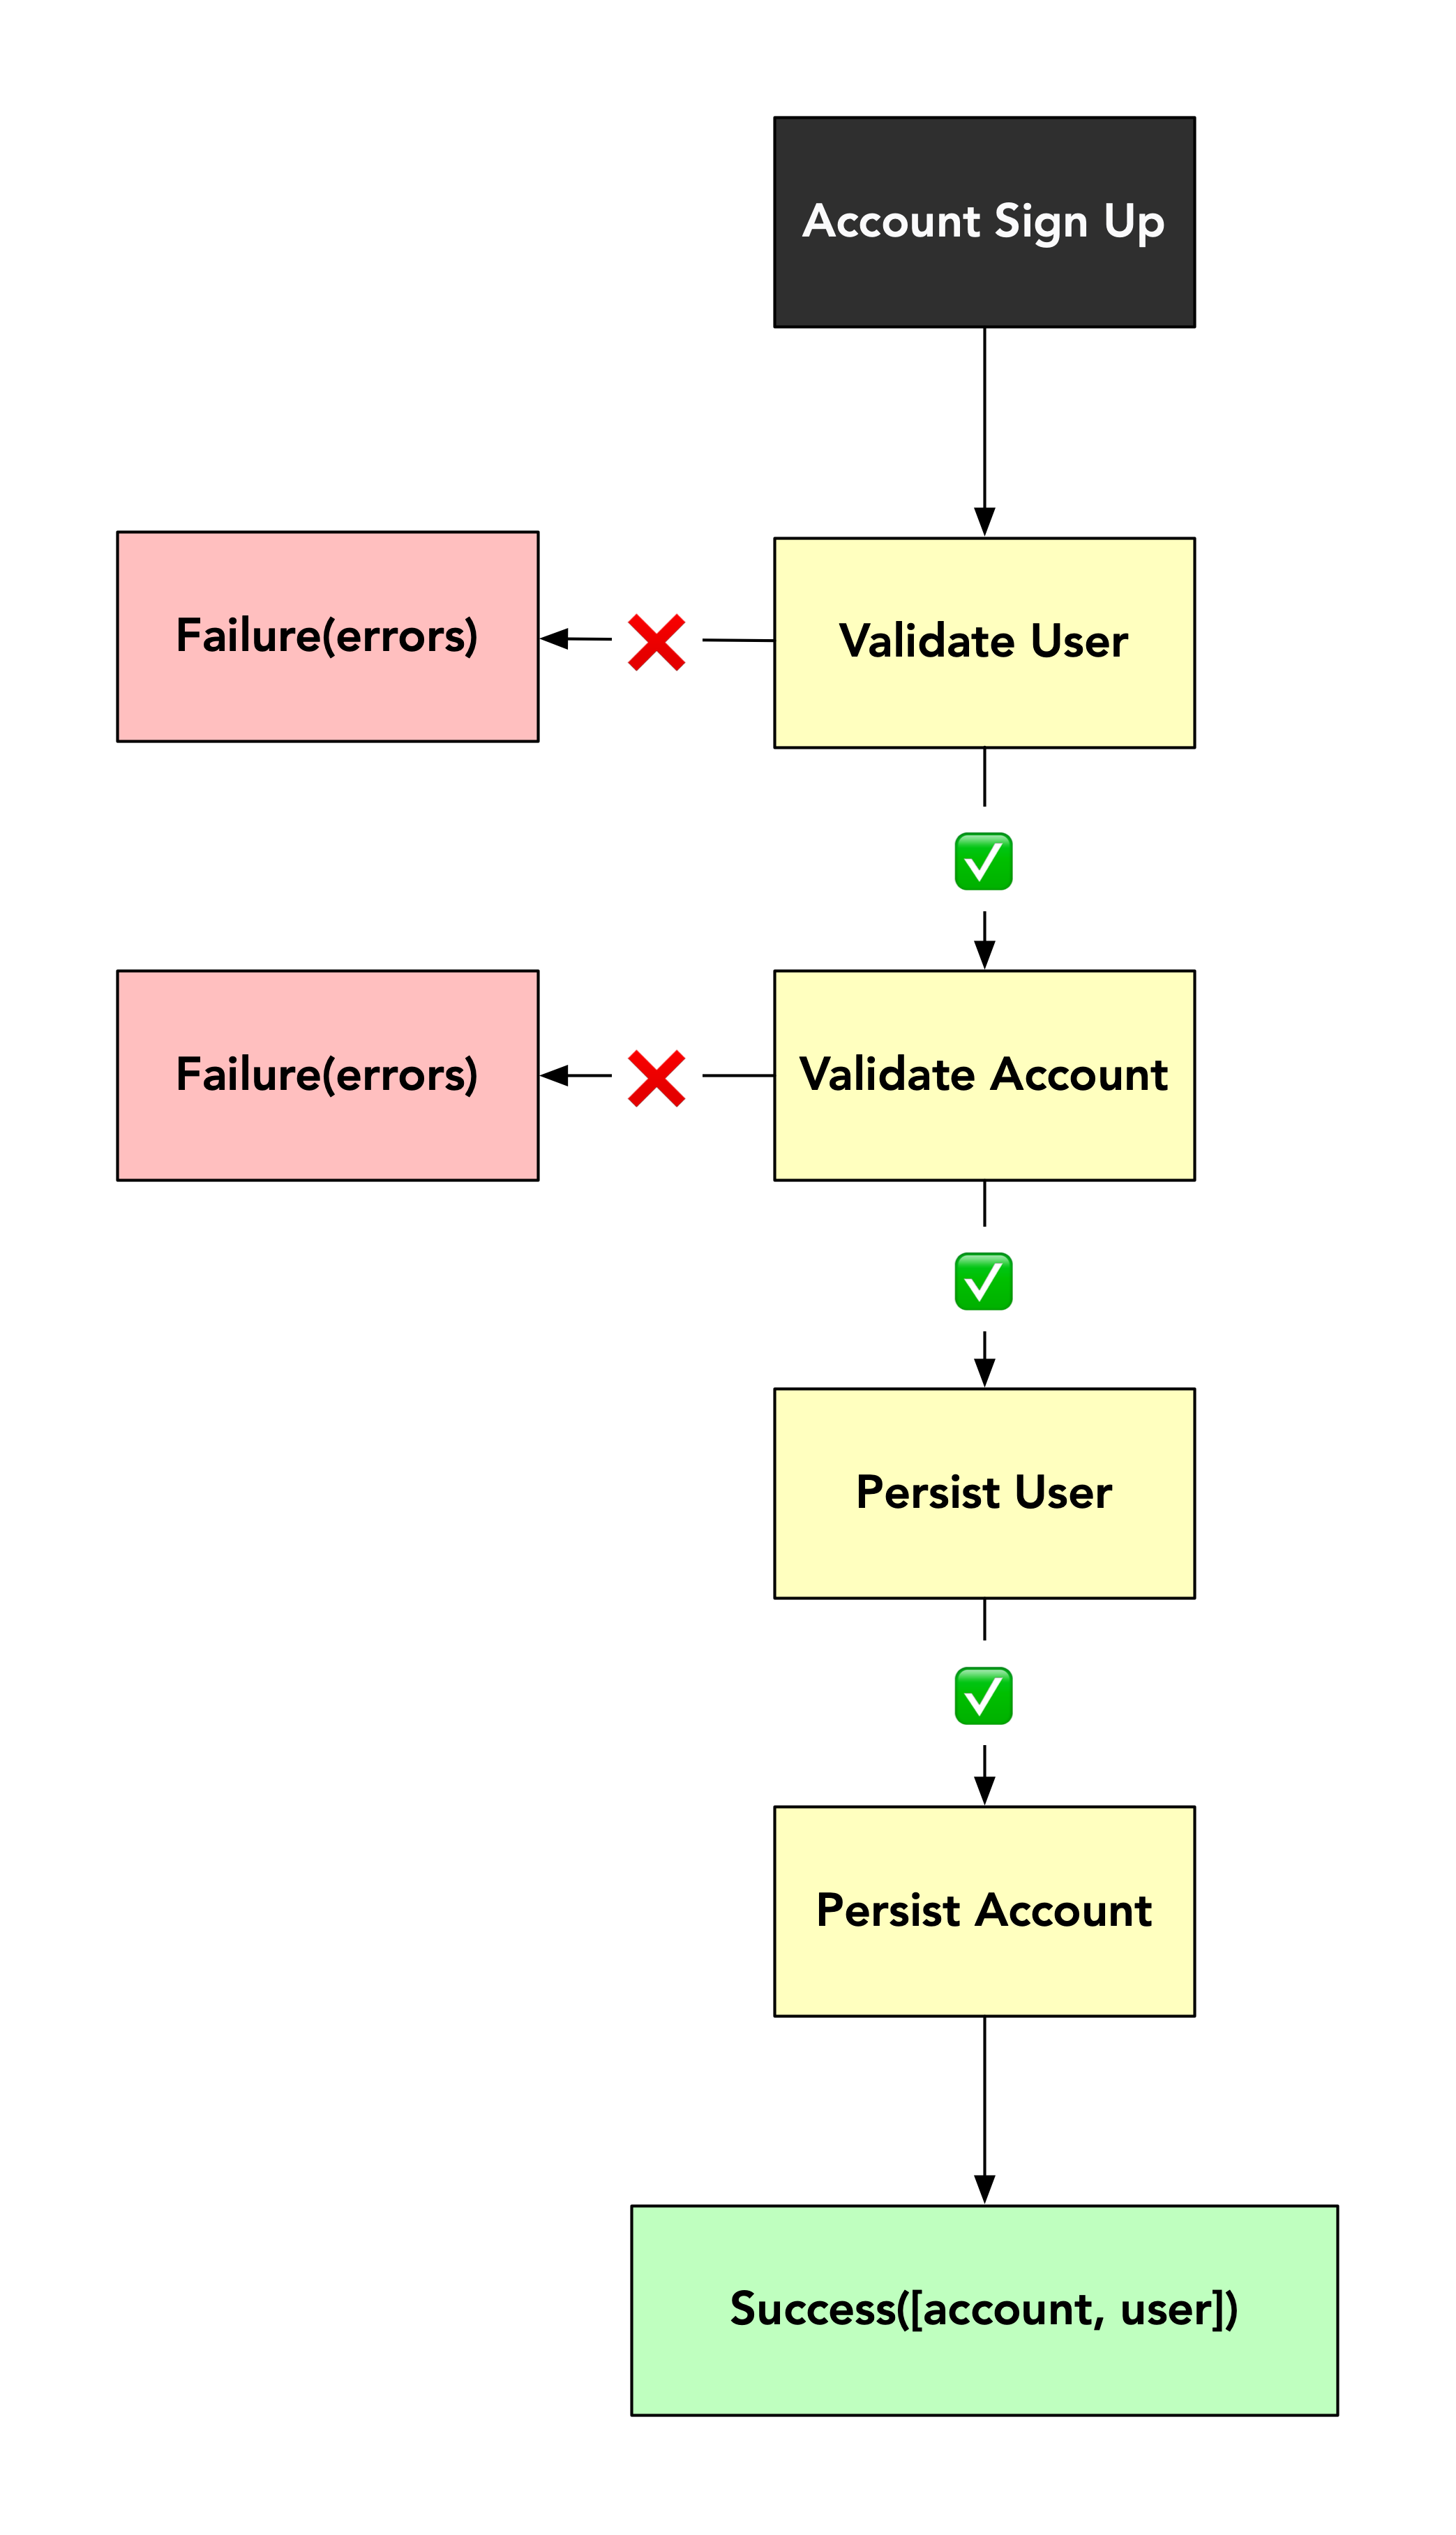
A operation class is a great way of grouping together all these steps into small, discrete methods.
Handling success or failure
Let’s now think about how we would actually use this CreateUser operation class in a real context, something a bit more specialised than a simple bin/console session. For this section, we’ll create a new file at the root of the Bix application, called operation_test.rb. In this file, we’ll put this content:
require_relative "config/application"

Bix::Application.finalize!

include Dry::Monads[:result]

input = {
  first_name: "Ryan",
  last_name: "Bigg",
  age: 32
}

create_user = Bix::Operations::Users::CreateUser.new
case create_user.call(input)
when Success
  puts "User created successfully!"
when Failure(Dry::Validation::Result)
  puts "User creation failed:"
  puts result.failure.errors.to_h # TODO variable result is not defined
end
This file starts out the same way as bin/console: we require config/application.rb and then “finalize” our application. This finalization step will load all the application’s files and start all of the application’s dependencies.
Next up, we include Dry::Monads[:result]. This gives us access to the Success and Failure result monad classes that we use at the end of this file.
Once we’ve set everything up, we define an input hash for our operation, and the operation itself. When we call the operation, we can use a case to match on the outcome of the operation. If it is successful, we output a message saying as much. If it fails, and the failure is a validation failure (indicated by the failure being a Dry::Validation::Result failure), we output the validation error messages.
Here we’ve seen a very simple way of handling the success or failure of a operation. This code is very similar to how we would use the operation in another context, such as a controller. The great thing about a operation is that we aren’t limited to using it just within a controller – we could use it anywhere we pleased. This example is just a small one showing us how we could use it.
In Part 4 of this guide, we’ll re-visit how to use this operation in a different context.
Automatically injecting dependencies
Before we finish up this part of the showcase, I would like to demonstrate one additional piece of cleanup that we could do. Let’s re-visit our operation’s code:
module Bix
  module Operations
    module Users
      class CreateUser
        include Dry::Monads[:result]
        include Dry::Monads::Do.for(:call)

        def call(params)
          values = yield validate(params)
          user = yield persist(values)

          Success(user)
        end

        def validate(params)
          create_user = Bix::Contracts::Users::CreateUser.new
          create_user.call(params).to_monad
        end

        def persist(result)
          user_repo = Bix::Repos::UserRepo.new
          Success(user_repo.create(result.values))
        end
      end
    end
  end
end
This code looks pretty clean as it stands. But there’s one extra thing we can do to make it even tidier, and that thing is to use dry-auto_inject’s import feature. When we define things like the CreateUser contract or the UserRepo within our application, these classes are automatically registered with Bix::Application, because we’ve directed the application to auto_register things in lib. This happened over in config/application.rb:
require_relative "boot"

require "dry/system/container"
require "dry/auto_inject"

module Bix
  class Application < Dry::System::Container
    configure do |config|
      config.root = File.expand_path('..', __dir__)
      config.default_namespace = 'bix'

      config.auto_register = 'lib'
    end

    load_paths!('lib')
  end

  Import = Dry::AutoInject(Application)
end
We saw earlier that we could refer to the ROM container with the syntax include Import["container"] within our UserRepo class. Well, we can do the same thing with our contract and repository in this operation class too.
Here’s how we’ll do it. At the top of the class, we’ll put these two include lines:
module Bix
  module Operations
    module Users
      class CreateUser
        include Dry::Monads[:result]
        include Dry::Monads::Do.for(:call)

        include Import["contracts.users.create_user"]
        include Import["repos.user_repo"]
...
By using include like this, we will be able to access our contract and repository in a simpler fashion. To do that, we can change our validate and persist methods in this operation to this:
def validate(params)
  create_user.call(params).to_monad
end

def persist(result)
  Success(user_repo.create(result.values))
end
That’s a lot cleaner, isn’t it? We’re now able to refer to the contract as simply create_user, and the repository as user_repo, without putting in those ugly namespaces into these methods. This syntax also more clearly defines the other class dependencies this operation has, right at the top of the class. We don’t need to scan through the class to figure out what they are anymore.
To make sure that things are working again, let’s try running ruby operation_test.rb again. If the input hash at the top of this file contains valid input, then we should see the successful message still:
User created successfully!
If this operation class went on to use other classes from our application, we could import them with very little effort, thanks to the dry-system and dry-auto_inject gems.
Summary
In this 2nd part of the ROM and Dry showcase, we have used the dry-validation gem to add a contract to our application. A contract is a class that contains validation logic. It’s a way of saying that incoming data must meet some criteria before our application can use it.
In the second half of this guide, we used dry-monads to define a operation class within our application for creating users. This class is a collection of all the actions that our application would have to take to create a user. So far, there are only two of them: validate and persist. This class uses the contract to first validate the input, and then if that validation succeeds, the class will create a user in the database by using the repo.
In the final part of this guide, we used dry-auto_inject once more to automatically inject the repository and contract into our operation class, allowing us to tidy up the code very slightly, but still noticeably.
In the next part, we’re going to look at how we can test the parts of the application that we’ve built so far by using the RSpec testing framework. We’ll also see another advantage of dry-auto_inject in this part.