This blog post is part of a series called “Hanami for Rails Developers”.
- Part 1: Models
- Part 2: Controllers (you are here)
- Part 3: Forms
- Part 4: Associations
In the first part we saw how to interact with a database by using Hanami’s repositories and relations. In this part, we continue that by serving that data out through routes of our Hanami application.
To get started here, we can run the Hanami server (and its asset compilation step) by running:
hanami dev
This will run a server on localhost:2300 and once you come back to the browser to figure out why your muscle-memory’d localhost:3000 didn’t work, change that 3000 to a 2300.
Routing
In a Hanami application, you can find the routes in the familiar location of config/routes.rb. We can add a route to this application by changing this file to this code:
module Bookshelf
  class Routes < Hanami::Routes
    root to: "books.index"
  end
end
Note that the code here uses a dot to separate the controller and the action, rather than a hash/pound-sign (#).
A route by itself, like in a Rails app, doesn’t do very much. We need a matching action for this.
Actions
We generate an action in Hanami by running:
hanami g action books.index
This time, I will list the files this generates, as this a key part where Hanami differentiates itself from Rails:
Updated config/routes.rb
Created app/actions/books/
Created app/actions/books/index.rb
Created app/views/books/
Created app/views/books/index.rb
Created app/templates/books/
Created app/templates/books/index.html.erb
Created spec/actions/books/index_spec.rb
This has updated our config/routes.rb file to include a new /books route:
get "/books", to: "books.index"
Classes in Hanami applications are namespaced automatically under the application’s name. You can see this by looking at the two classes generated for us here which are both created under the Bookshelf namespace: Actions::Books::Index, and Views::Books::Index.
Hanami has no controllers, and instead splits this logic between two classes: actions and views.
The purpose of actions is to handle all the parameter parsing and response handling of a request. This is where you might also put behavior like authenticating or authorizing a user before they can perform this particular action. An action can decide based on these parameters to render either the default view, or a different one. An action in Hanami can also validate the input parameters before deciding to proceed with the action.
The purpose of views is to gather up and present the data once an action has decided which version of a view to render. In a Rails app, you may see similar handling by way of respond_to.
Views
Views typically have a template to render as well, and in this application we now have app/templates/books/index.html.erb. This is the same kind of file you’d get with Rails, only in Rails it would be under app/views. Views in Hanami have a different meaning, and that can take some time to get your head around.
At the moment, requests to http://localhost:2300/books shows very little, just a big H1 showing: Bookshelf::Views::Books::Index. This isn’t going to drive engagement for our book application. We’ll add some books to this page instead, by fetching them from the database and displaying them here.
To fetch these books from the database, we will open app/views/books/index.rb and fetch all the books with this code:
module Bookshelf
  module Views
    module Books
      class Index < Bookshelf::View
        include Deps["repos.book_repo"]

        expose :books do
          book_repo.all
        end
      end
    end
  end
end
When coming from a Rails application where it is almost forbidden (but possible!) to put a database query in a view, it might feel weird to put a database call into a class with “Views” in the name.
In Hanami, we put the database loading in the view because the action might have had a reason to not need to load all the books, such as if there was an authorization rule on the action that was blocking the request.
At the top of this view, we include the book repository as a dependency by using include. This makes it explicit what external dependencies this view has, right at the top of the file.
In a Hanami view, we expose the data to the view explicitly with the use of expose, rather than defining an instance variable and it magically appearing in the template. The book_repo method here comes from the earlier include, and it will be an instantiated version of the Repos::BookRepo class.
Speaking of templates, we can display these books from our database by writing some ERB code. This will land us in well familiar territory. The template for this action lives at app/templates/books/index.html.erb. We’ll remove all the content in this file, and replace it with our own:
<h1>Books</h1>

<% books.each do |book| %>
  <div>
    <h2><%= book.title %></h2>
    <p>Author: <%= book.author %></p>
    <p>Year: <%= book.year %></p>
  </div>
<% end %>
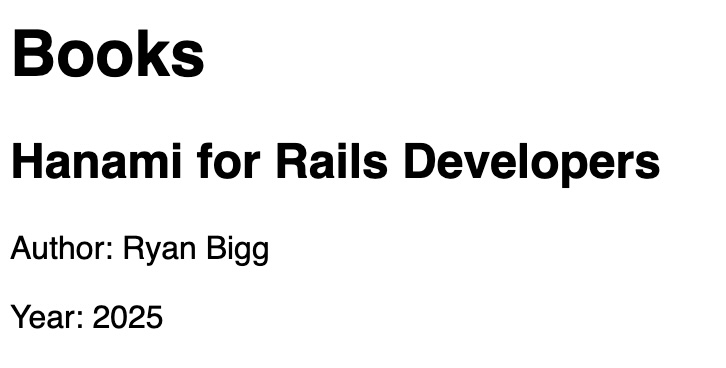
When we refresh this page, we’ll now see our book coming back:

We’re now able to display a list of books, but let’s look at how we can display books from a given year.
Working with parameters
In this Hanami application, we would like a route at /books/year/2025 to return only the books from that specified year. Let’s add that route to the config/routes.rb file in our application now:
get "/books/year/:year", to: "books.index"
This action will route to the index action, the same as our previous route. To make this action behave differently based on if we’re asking for all books or all books for a particular year, we’re going to update the action’s code in app/actions/books/index.rb to this:
module Bookshelf
  module Actions
    module Books
      class Index < Bookshelf::Action
        include Deps[
          books_index: "views.books.index",
          books_by_year: "views.books.by_year"
        ]

        def handle(request, response)
          if request.params[:year]
            response.render(books_by_year, year: request.params[:year])
          else
            response.render(books_index)
          end
        end
      end
    end
  end
end
We’re again importing dependencies into this action, this time some instances of our relative views. If the year parameter is specified, we’re going to render the books_by_year view, passing it the year parameter.
If the parameter isn’t set, we’ll render books_index, which will show us the list of all books.
The books.by_year view doesn’t exist yet, so let’s create it:
hanami g view books.by_year
In this view, we’ll want to fetch all the books for a particular year. We can do this with this code:
module Bookshelf
  module Views
    module Books
      class ByYear < Bookshelf::View
        include Deps["repos.book_repo"]

        expose :books do |year:|
          book_repo.by_year(year).to_a
        end

        expose :year
      end
    end
  end
end
The block used in expose take in the parameter passed in from the controller and display us a list of books from that year. As we’ll want to expose the year itself to our view, we need to explicitly call that out in the view too.
In the matching template for this view, app/templates/books/by_year.html.erb, we’ll add this code:
<h1>Books from <%= year %></h1>

<% books.each do |book| %>
  <div>
    <h2><%= book.title %></h2>
    <p>Author: <%= book.author %></p>
  </div>
<% end %>
This view will now display a list of books from 2025 when we go to http://localhost:2300/books/year/2025.

We’ve now added two ways to use the same action, with two different views. In a RESTful application, we would typically have more actions than this. You’d be familiar with the set of them from a Rails application:
- index
- show
- new
- create
- edit
- update
- destroy
In the remainder of this part, we’ll cover off the show action. We’ll leave the forms to the next part of this guide.
Adding a show route
We’re now going to add a show action to our application, allowing us to display information about a single book. When we add this route, we will also add a link from our books “index” actions to the show action. Rather than starting with the route, we’ll start with generating an action:
hanami g action books.show
Hanami is smart enough to generate us an action and a route with this command. Here’s what it has added to config/routes.rb:
get "/books/:id", to: "books.show"
This route is exactly the kind of route you’d get with a Rails application. With one key difference: we don’t yet have a named way to refer to this route. In Hanami, we can give routes names using as:. Let’s make that change in our routes now:
get "/books/:id", to: "books.show", as: :book
To send our users to this page, we need to create a link from there to the show page. Let’s open up app/templates/books/index.html.erb and change this line:
<h2><%= book.title %></h2>
To this:
<h2><%= link_to book.title, routes.path(:book, id: book.id) %></h2>
Let’s also make this same change in app/templates/books/by_year.html.erb too.
Routing methods in Hanami aren’t dynamically generated like in Rails, and so we need to write these out in a slightly longer format.
Now that we have a route, we need to display some information on the page where this route goes to. We’ll need to pull that information out of the database before we can display it. Let’s go over to our Books::Show action in app/actions/books/show.rb, and pass down the id parameter to the view:
module Bookshelf
  module Actions
    module Books
      class Show < Bookshelf::Action
        def handle(request, response)
          response.render(view, id: request.params[:id])
        end
      end
    end
  end
end
Rather than views instantly getting access to all parameters, we must expose these from the action first. We can pass these in with response.render(view, ...), as this will render the default view for this action.
To then make the view fetch this book from the database, we’ll make these changes in app/views/books/show.rb:
module Bookshelf
  module Views
    module Books
      class Show < Bookshelf::View
        include Deps["repos.book_repo"]

        expose :book do |id:|
          book_repo.find(id)
        end
      end
    end
  end
end
This view is now using the book repository to find the book with that ID. When it finds that book, it’ll expose the book to the template. Let’s use that to display information about the book now in app/templates/books/show.html.erb:
<h1><%= book.title %></h1>

<p>Author: <%= book.author %></p>
<p>Year: <%= book.year %></p>
Parts - Hanami’s decorators
Writing these routes out in longer form is going to get tiring after a while. Fortunately for us, Hanami provides a location where we can add methods that decorate the objects that we use in a view.
When we expose data from an action, Hanami wraps this data in another class, which it calls a Part. In the case of the expose :books that we have, it will wrap these in two distinct parts:
Views::Parts::Books- for the whole array of booksViews::Parts::Book- one wrapping for each of the books
We didn’t create these classes. Hanami did that for us. Hanami uses the class of the struct to determine which part to use.
We can define these classes ourselves if we want to add decorations to the objects exposed here. A good example of this would be to add a show_path method to books, so that we don’t have to write out the route long-form all the time.
We can create a new class at app/views/parts/book.rb and define this method inside:
module Bookshelf
  module Views
    module Parts
      class Book < Bookshelf::Views::Part
        def show_path
          context.routes.path(:book, id: id)
        end
      end
    end
  end
end
Methods of this class act as though they’re defined as instance methods on Book. This works because in the view we’re actually working with Views::Parts::Book, rather than a straight Bookshelf::Structs::Book instance. The context used here is the Hanami view rendering context, which we use to get to the routes method.
By defining this show_path this way, we can now change our links in app/templates/books/index.html.erb and app/templates/books/by_year.html.erb to simply this:
<h2><%= link_to book.title, book.show_path %></h2>
The great thing about this is that if we ever want to know where show_path is defined, we can simply do a find in our codebase for this method, and it will turn up the part. Contrast that to Rails’ dynamic routing methods, and you’ll see that this a vast improvement.